Step-by-Step Tutorial for Integrating Singular with Unity for Game Developers

Introduction
Have you ever wondered how top app developers keep track of where their downloads come from or how they figure out which ads are working? Or maybe how users coming from their ads behave - for example, are they retaining or generating revenue? That's where Mobile Measurement Partners (MMP) like Singular come into play. An MMP helps you track your app’s marketing campaigns across different Ad networks or platforms to determine where your installs and interactions originate. This is crucial for optimizing your marketing efforts and spending your budget wisely to generate a positive return on ad spends or ROAS!
Integrating the Singular SDK into your Unity app is like charging up your performance marketing. Whether you’re looking to ramp up user engagement, smarten up your ad spend, or crank up your overall ROI, Singular arms you with the necessary tools to make informed, data-driven decisions.
This blog serves as the simplest and most straightforward guide for setting up the Singular SDK in your Unity project—from adding your app to the Singular platform, all the way to tracking the revenue it earns with post-back events. This guide is perfect for developers, marketing pros, and non-technical folks. This is your one-stop shop for integrating Singular in the easiest way possible. Let’s get started!
Getting Started: Adding your app on Singular
Adding your app to Singular is your first step towards smart analytics and better campaign tracking. Here’s how you kick things off: Navigate to Settings, then Apps. You can add your app manually or you might find it's been added automatically - just confirm the details. Make sure the app name matches what’s on your ad networks, choose its platform home, and either save it with a URL or a Bundle ID. Let's dive in and get your app set up!
- In the Singular platform, go to Settings > Apps.
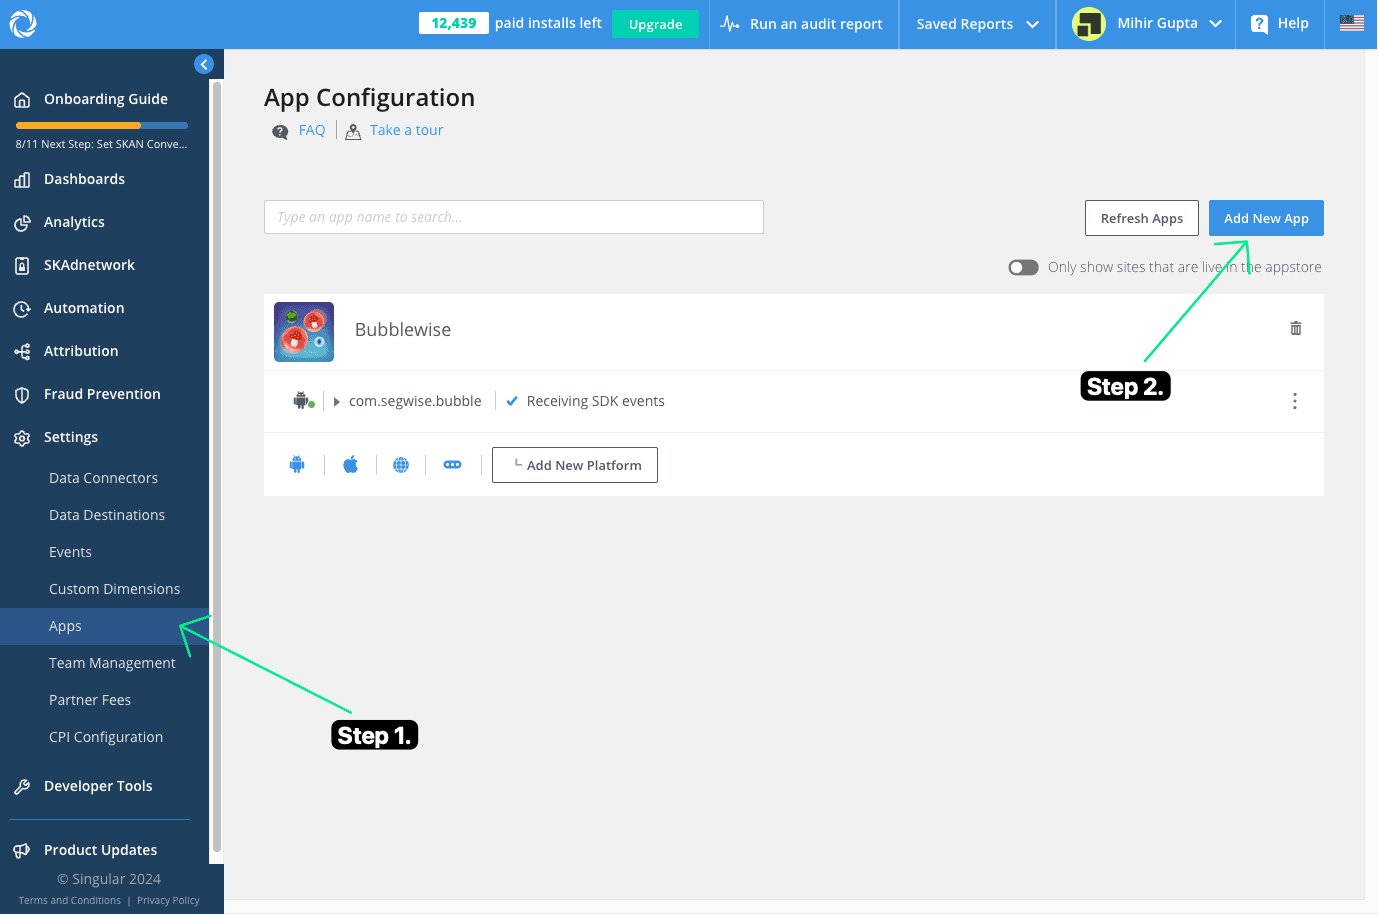
- If your app was not added automatically, click Add New App.
- If your app is sending events to Singular and is live in the app store, your app may be added automatically. Find your app and confirm the Name and Store URL.
- Under the newly created app, enter the app name spelled exactly as in your ad networks.
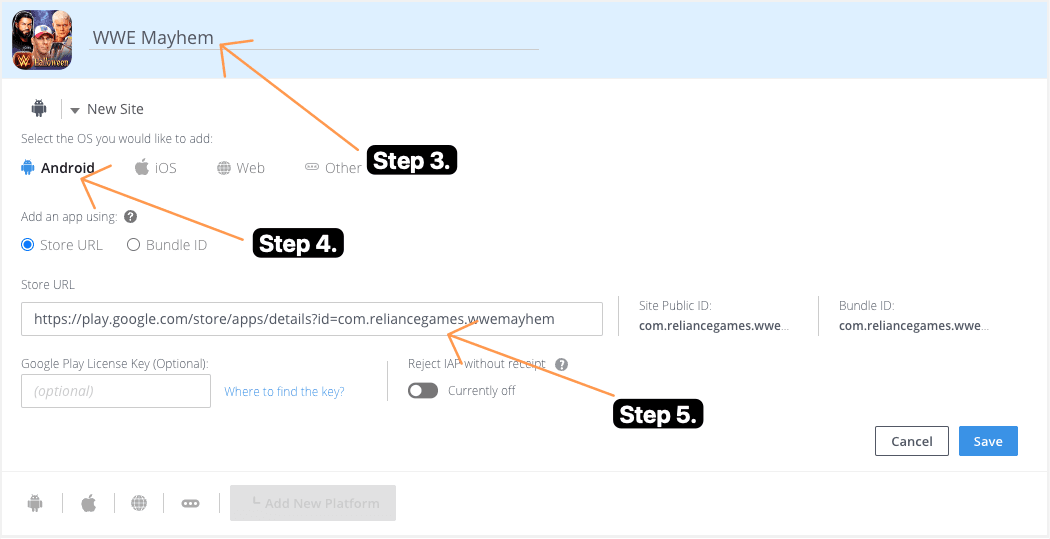
- Select the platform on which your app is or will be published. This is called an App Site.
- If your app is already live, paste the URL of the relevant app store in the Store URL field and click Save.
If your app isn't live, select the Bundle ID option, paste your app's ID in the Bundle ID field, and click Save.
Step-by-Step: Integrating the SDK into Unity
It’s time to roll up your sleeves and get the Singular SDK up and running in your Unity App. This part is tailor-made for those who love to dive into code and tinker around with game settings. If you’re not the one who usually deals with code, maybe send this over to your dev team.
Here’s a snapshot of what the integration looks like. First, you’ll get the SDK directly from Singular’s GitHub using the Unity Package Manager - it’s pretty straightforward but stick close to the instructions if you want to avoid any hitches. Next up, you’ll initialize the SDK with some keys from Singular’s vault, to get our app talking to Singular by setting some custom user IDs. Lastly, we’ll jump into the fun part: tracking events and bringing in that data. Ready to boost your game’s metrics and insights? Let’s get started!
Step 1: Install SDK
We will be using the Unity Package Manager (UPM) to install the Singular Unity SDK
In the Package Manager window:
- Click the [+] button
Select "Add package from git URL
Input the Singular Unity SDK GitHub URL:
https://github.com/singular-labs/Singular-Unity-SDK.git
- Click the "Add" button
- IMPORTANT: If you are NOT using Google's EDM4U, follow these additional steps.
- Download the required dependencies from Singular's S3 bucket. For SDK Version 5.2.1, the Plugins.zip is:
https://s3.us-west-2.amazonaws.com/maven.singular.net/unity/UPM-non-EDM4U/5.2.1/Plugins.zip The extracted files should be moved to the Project Plugins folder.
- Download the required dependencies from Singular's S3 bucket. For SDK Version 5.2.1, the Plugins.zip is:
Step 2: Initialise the SDK
To initialize the SDK, you first need to get the SDK Key and SDK Secret from the Singular Dashboard ("Developer Tools > SDK Integration > SDK Keys")
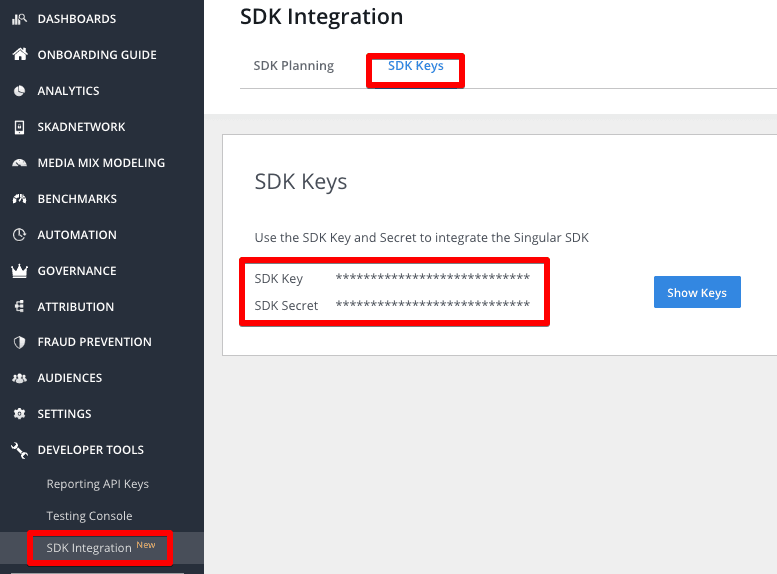
IMPORTANT: DO NOT USE the Singular Reporting API Key or your SDK data will not be received. Follow the instructions above to retrieve the proper key and secret.
You can then initialize the SDK by either of the ways listed below:
Adding the SingularSDKObject using the Singular prefab object
Add the SingularSDKObject to the Hierarchy
From the Project pane, Navigate to: Packages > Singular > SingularSDK > Prefabs.
Move the SingularSDKObject into the Hierarchy pane.
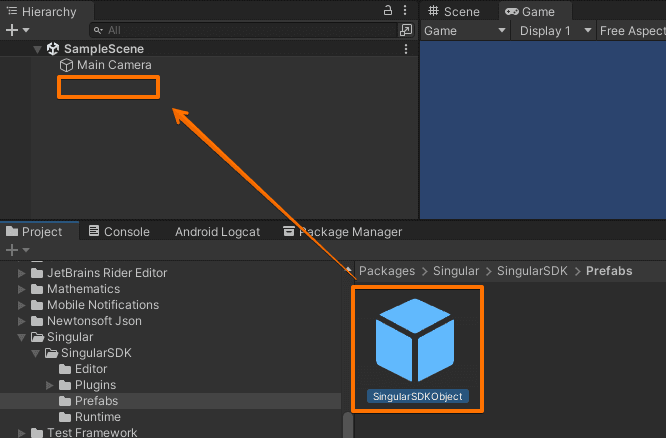
Configure the SingularSDKObject Settings
In the Inspection pane for the SingularSDKObject, paste your Singular SDK Key and SDK Secret into the respective fields. To retrieve the SDK Key and Secret, log into your Singular account and go to "Developer Tools > SDK Integration > SDK Keys").
- Manually add the "SingularSDKObject" GameObject
Create an Empty GameObject in your Main scene.
Name the GameObject: SingularSDKObject.
IMPORTANT: The GameObject must be named "SingularSDKObject" for Singular's SDK to function.Click on the SingularSDKObject.
Navigate to the Inspection Pane.
From the Inspection pane, Click Add Component
In the search field, type "Singular" and select the "Singular SDK" script.
NOTE: We recommend using the first method.
After you’ve added the “SingularSDKObject”, in the Inspection pane for the SingularSDKObject, paste your Singular SDK Key and SDK Secret into the respective fields.
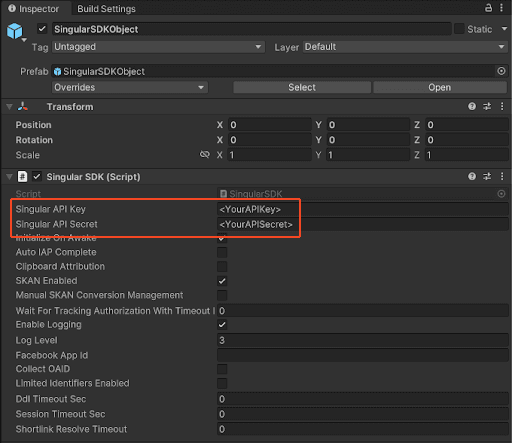
Step 3 [Optional]: Send Internal User ID to Singular
If you already have an internal user ID for each of your users, for example from Firebase authentication, you can pass it to singular.
To set the User ID, use the SetCustomUserId method. To unset it (for example, if the User "logs out" of the account), call UnsetCustomUserId.
SingularSDK.SetCustomUserId("custom_user_id");SingularSDK.UnsetCustomUserId();
Do remember the following points:
- The User ID can be any identifier and should not expose PII (Personally Identifiable Information). For example, you should not use a User's email address, username, or phone number. Singular recommends using a hashed value unique only to your first-party data.
- The User ID value passed to Singular should also be the same internal User ID you capture across all platforms (Web/Mobile/PC/Console/Offline).
- Singular will include the User ID in user-level exports, ETL, and Internal BI postbacks (if configured). The User ID is first-party data, and Singular does not share it with other parties.
- When set with the Singular SDK Method, the User ID value persists until it is unset using the UnsetCustomUserId method or until the app is uninstalled. Closing or restarting the app does not unset the User ID.
Step 4: Tracking Events
Singular can collect additional data in the form of in-app events to help analyze the performance of your campaigns and measure KPIs. For example, your organization may want to collect data about user logins, registrations, tutorial completions, or leveling up in a gaming app.
Singular supports a variety of standard events. We recommend using standard events whenever possible. With each event you track, you can pass various attributes.
The function to send events has various signatures:
public static void Event(string name)

public static void Event(string name, params object[] args)

public static void Event(Dictionary<string, object> args, string name)
Note: When passing dictionaries, dictionary values must have one of these types: string, int, long, float, double, null, ArrayList, Dictionary<string, object>
Examples:
// 1) Send the standard event Login
SingularSDK.Event(Events.sngLogin);
// 2) An example custom event passing two key value pairs
SingularSDK.Event("myEventName", "Key1", "Value1", "Key2", 1234);
// 3) An example JSON Event passing a dictionary
// Create a dictionary for attributes
Dictionary<string, object> attributes = new Dictionary<string, object>();
// Add attributes
attributes["key1"] = "value1";
attributes["key2"] = "value2";
attributes["key3"] = "value3";
// Add more attributes as needed
SingularSDK.Event(attributes, "myEventName");
Step 5: Tracking Revenue
Singular can collect data about revenue gained through the app to help analyze the performance and ROI of your campaigns. Singular will make the data available in reports, log export, and postbacks.
Note: Any revenue reported in a different currency will be auto-converted to your organization's preferred currency set in your Singular account.
You can track revenue events using Unity's built-in IAP (In-App Purchases) object. This way, Singular gets all the available information about the purchase for richer reporting. Singular also gets the purchase receipt, which Singular uses in the back end to validate the purchase and rule out attribution fraud.
To help make the process even more secure, you can provide the following:
Android Licensing Key: Allows Singular to verify receipts cryptographically in Android. For more information, see Adding Your Google Play Licensing Key.
Also, to have Singular reject revenue from any purchase that doesn't come with a receipt, enable the Reject IAP Without Receipt option for your app on the Apps page.
Signatures
public static void InAppPurchase(Product product,
Dictionary<string, object> attributes, bool isRestored = false)

public static void InAppPurchase(string eventName,
Product product, Dictionary<string, object> attributes,
bool isRestored = false)

public static void InAppPurchase(IEnumerable<Product> products,
Dictionary<string, object> attributes, bool isRestored = false)

public static void InAppPurchase(string eventName,
IEnumerable<Product> products, Dictionary<string, object>
attributes, bool isRestored = false)
Examples:
// 1. IAP with a single product and no extra attributes
SingularSDK.InAppPurchase(myProduct, null);
// 2. IAP with a single product and attributes
var attr = new Dictionary<string, object>() {
["my_first_attribute"] = "value1",
["my_second_attribute"] = "value2"};
SingularSDK.InAppPurchase(myProduct, attr);
// 3. IAP with with a single product,
// no extra attributes and a custom event name
SingularSDK.InAppPurchase("MyCustomProduct",
myProduct, null);
// 4. IAP with list of products, no extra attributes
SingularSDK.InAppPurchase(myProductList, null);
// IAP with with list of products, no extra attributes
// and a custom event name
SingularSDK.InAppPurchase("MyCustomProducts",
myProductList, null);
Setting Up Attribution Integrations (Google Ads, Meta, Unity Ads etc.)
Mobile app attribution is essential for connecting the dots between user activities and the marketing campaigns that drive installs. By integrating attribution tools from Singular, you can effectively track the performance of your marketing efforts directly within your app. The setup process is divided into two main steps: first, connecting to attribution partners to push relevant data, and second, configuring your system to pull this data for comprehensive campaign analysis. This guide will walk you through both steps to ensure your campaigns are accurately tracked and optimized for the best results.
Step 1. Connect to Attribution Partners to push attribution data to the attribution partner
This step is important so that you can attribute installs and other events to an ad network (and campaigns, creatives, etc)
For SANs (Self Attributing Networks: an ad network that makes attribution decisions for itself without the use of third-party MMPs) such as Google Ads, there are slightly different steps for each.
Google Ads
This integration uses a “Link ID”, which is generated in Google Ads. Using this, Singular sends all installs, sessions and configured in-app events to Google
In your Google Ads account, generate a Link ID. [Note: You need administrative access to the account in order to create a link ID.]
In your Google Ads account, on the page menu click Tools icon 🛠️
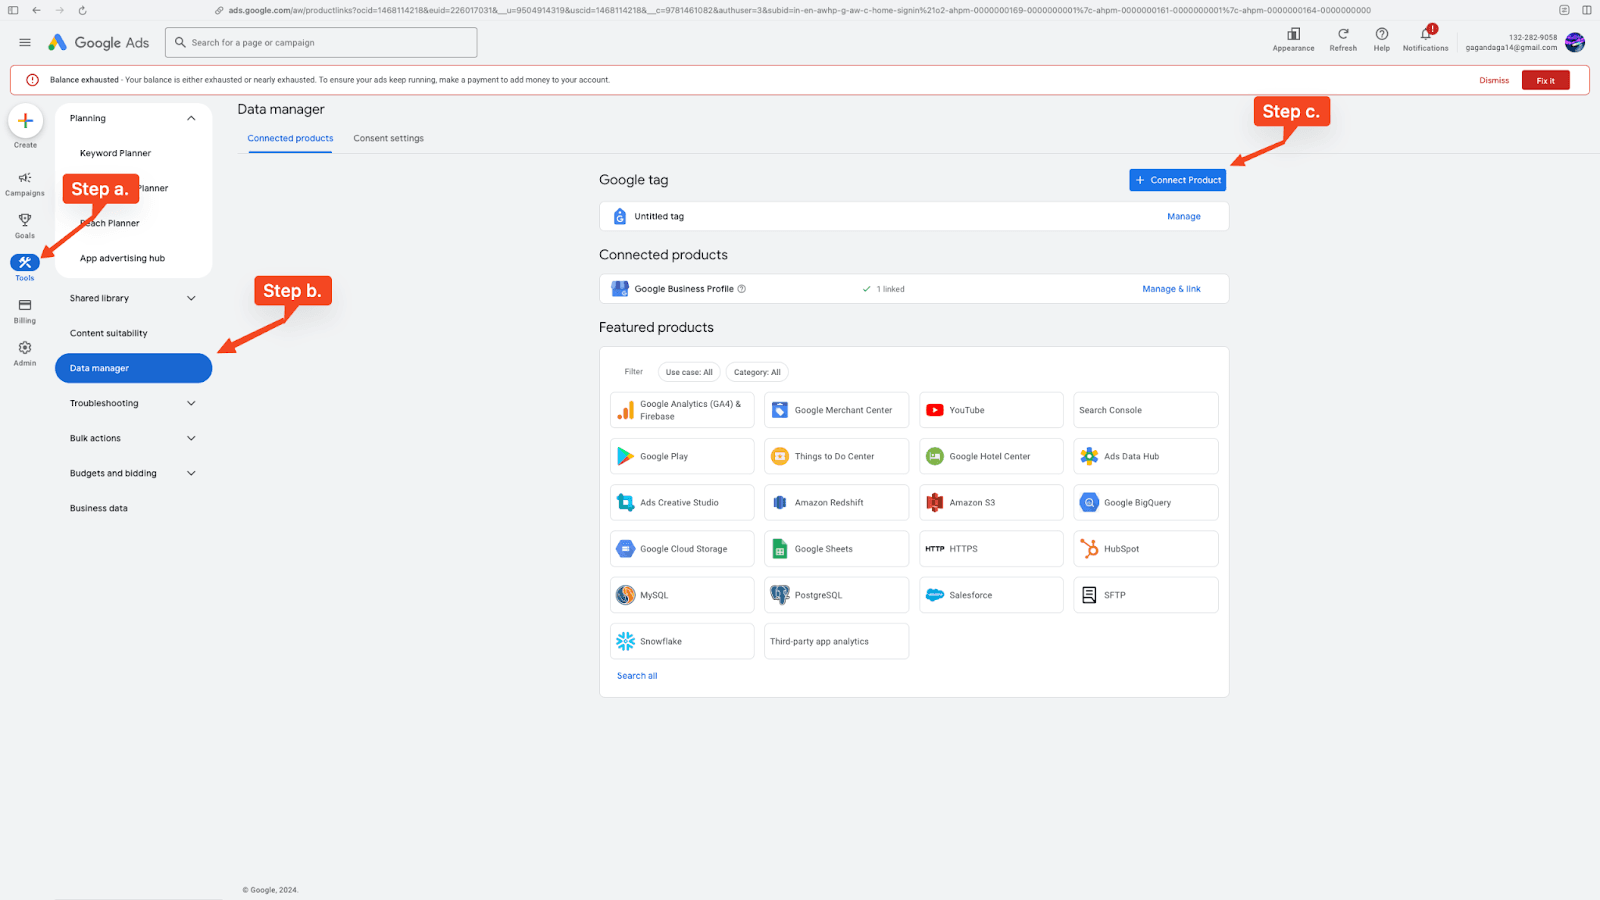
Click Data manager.
On the “Data manager” page click + Connect Product.
Select Third-party app analytics, and click Continue.
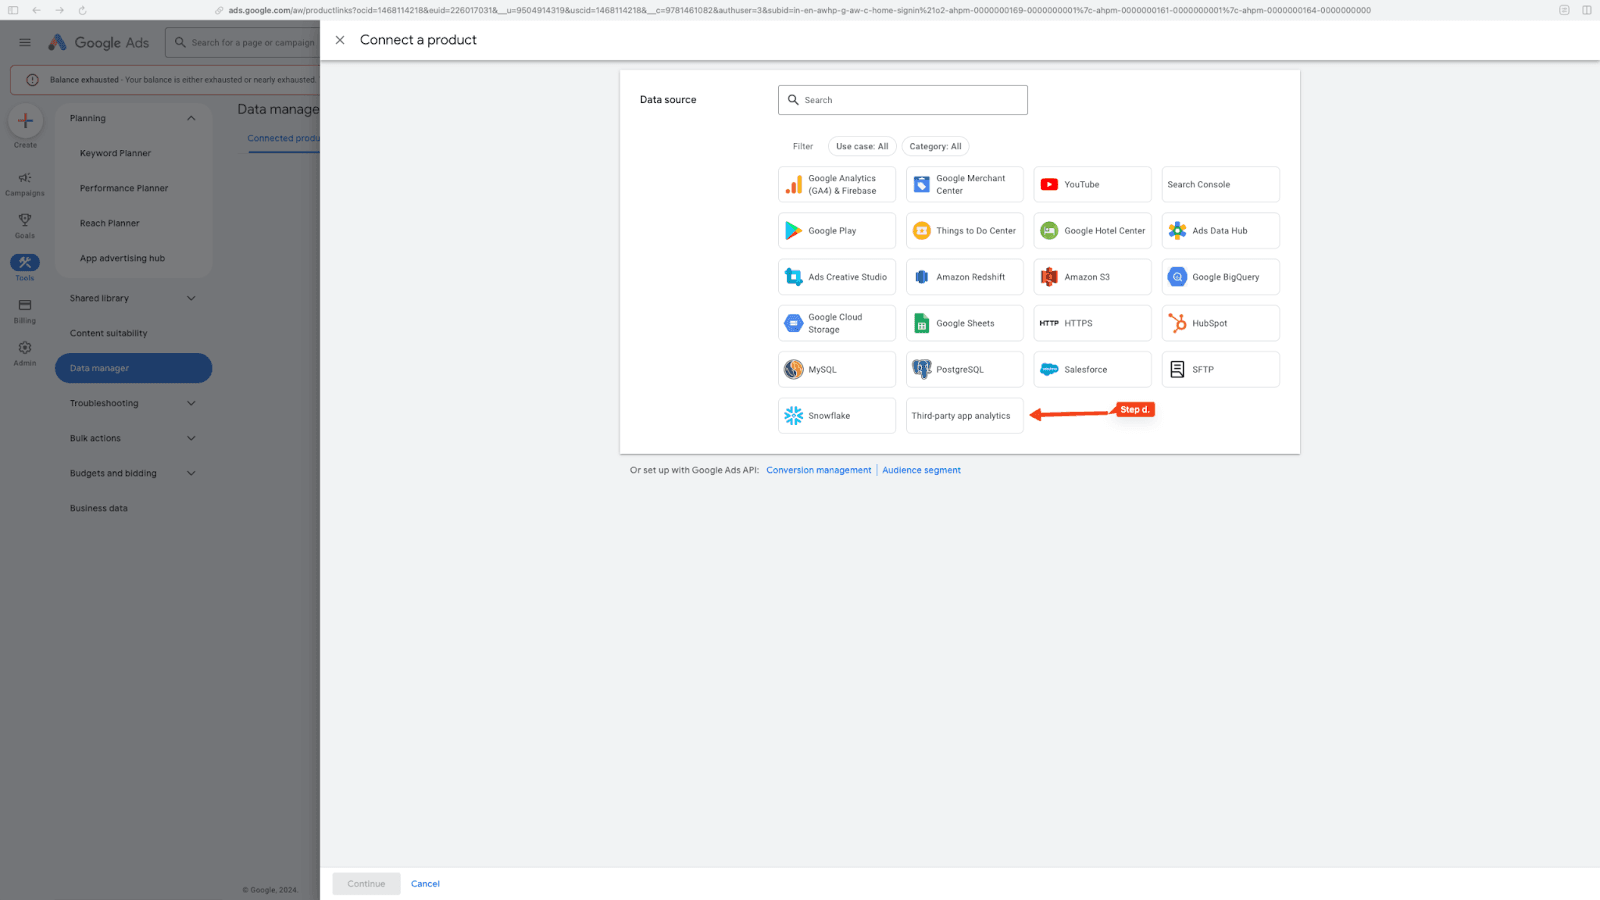
Click Create link ID.
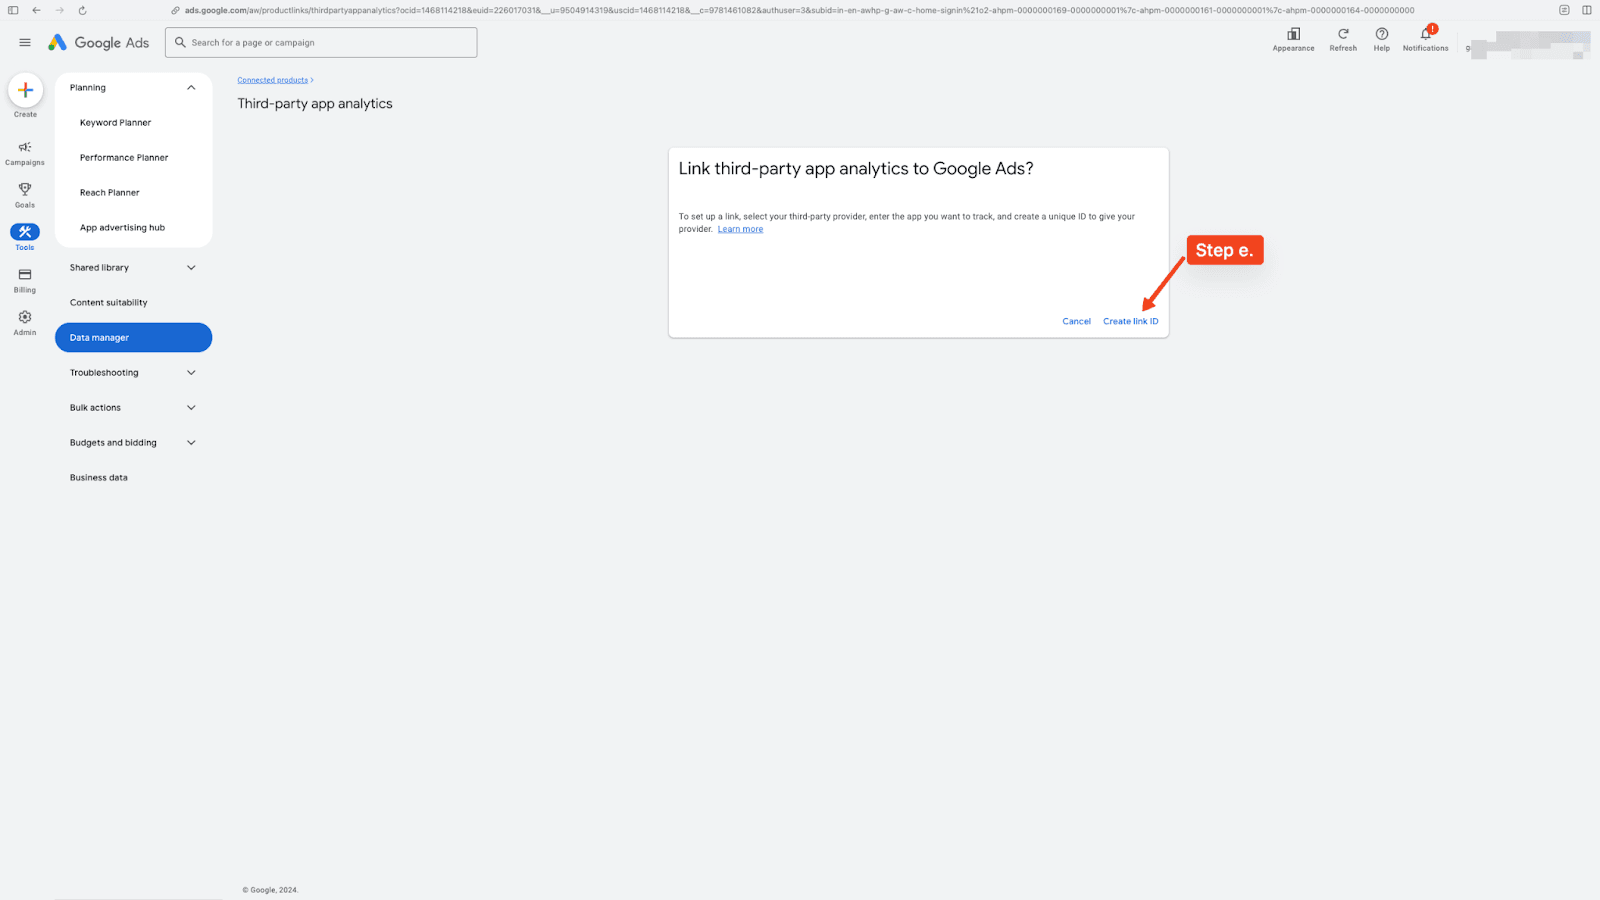
Choose from the following options:
- If you’ve never linked any app analytics providers to your Google Ads account, click Create link ID.
- If you already have app analytics providers linked to your Google Ads account and would like to create an additional link, click the plus button to link a new provider or app.Select Singular in the “App Analytics Provider” dropdown.
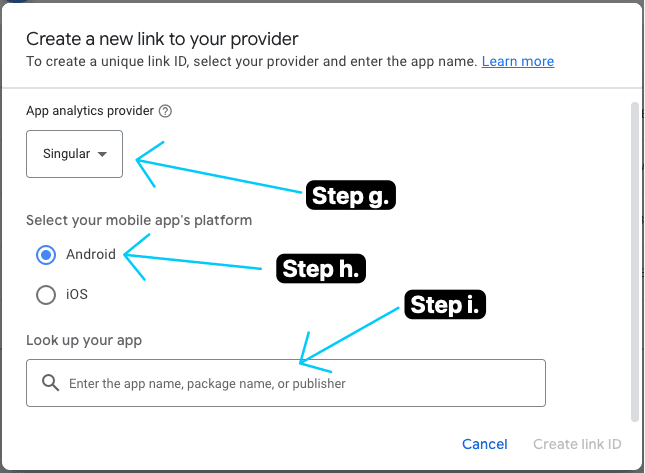
Select your mobile app’s platform.
Use the “Look up your app” field to find your app.
Click Create link ID.
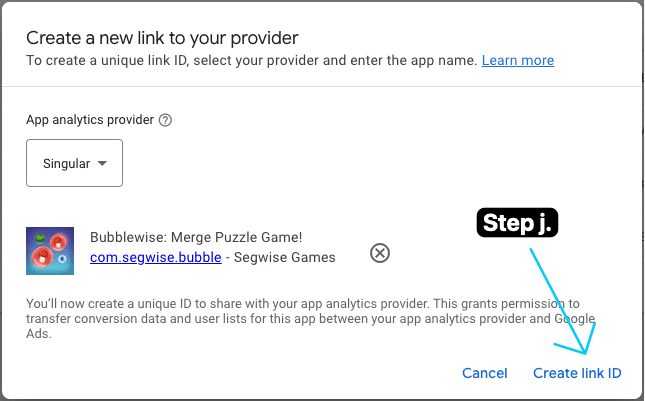
Click the copy button to copy your link ID. Paste this link ID into your third-party account.
Click Done. Your status will show “Unverified” until you’ve added your link ID to your third-party account and conversion data begins to flow into Google Ads.
- Go to Singular > Attribution > Partner Configuration.
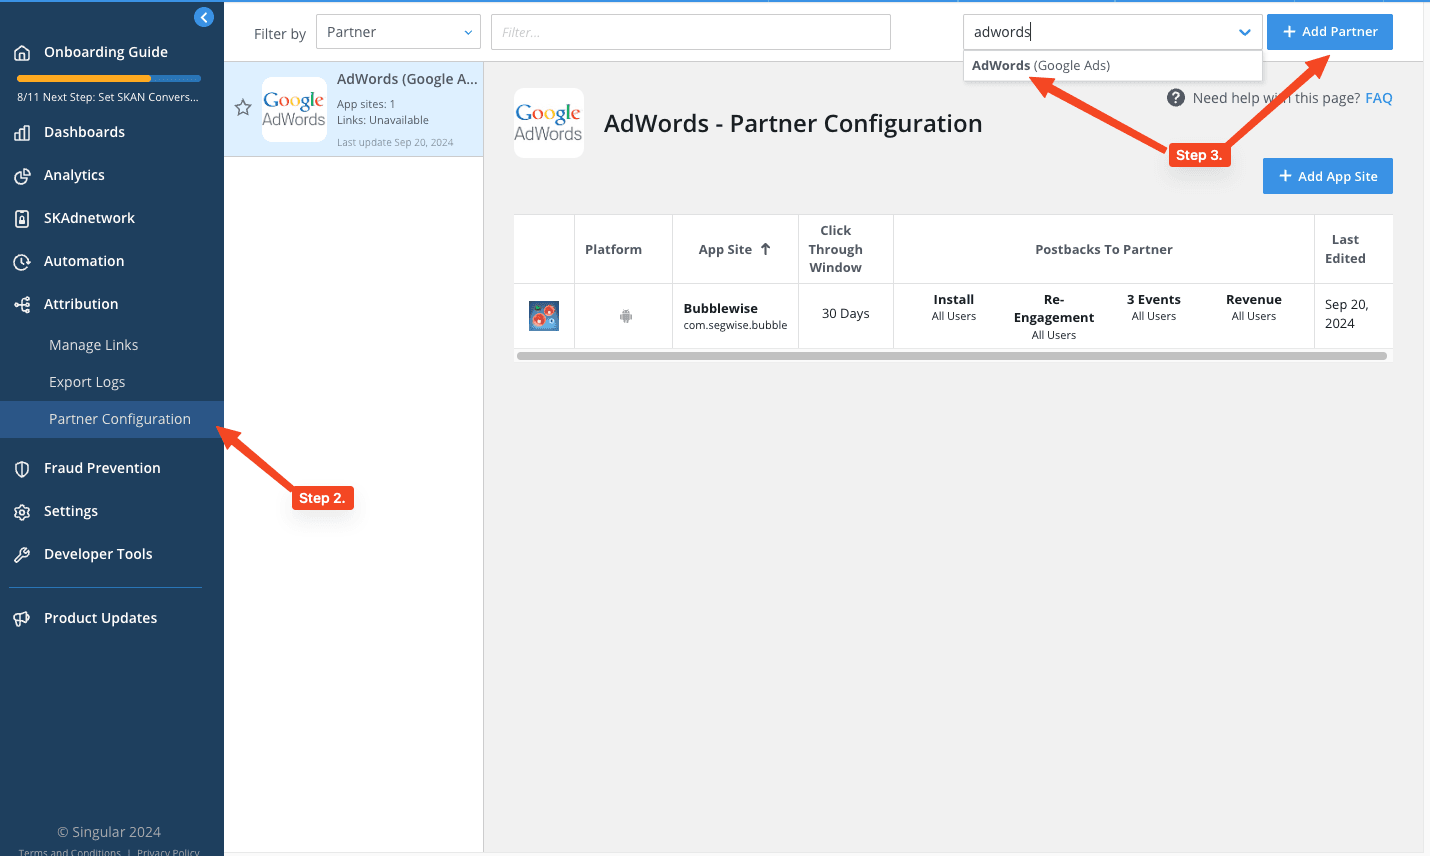
- Click “Add a Partner”, and type and choose Adwords (Google Ads).
- In the dialog, choose your App and App site (platform) to configure.
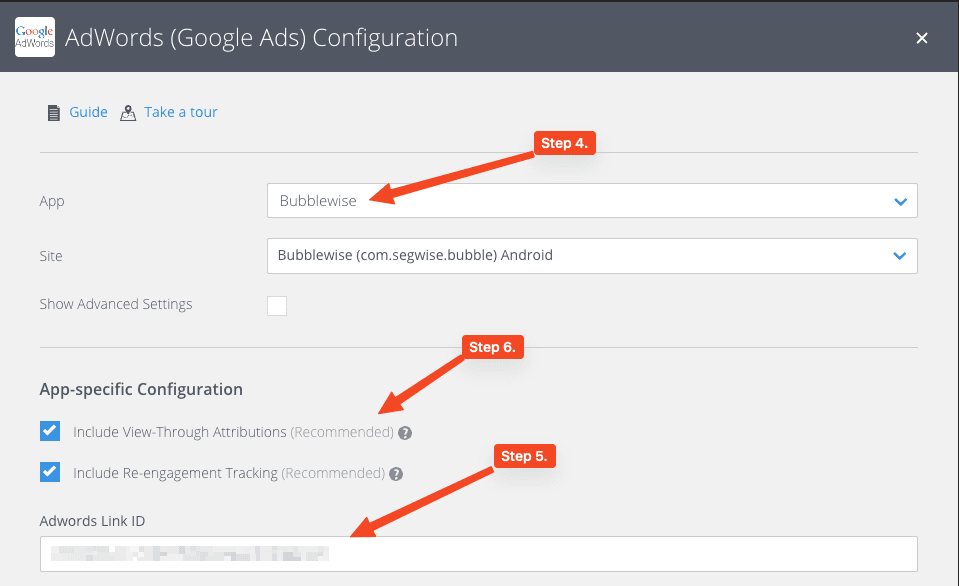
- Under Adwords Link ID, paste the ID that you generated in Step 1j
- Specify the given attribution settings. You can leave it as it is if you’re not sure what these options mean.
- Send Event Postbacks: To improve campaign optimization, allow Singular to send postbacks about in-app events to Google Ads. Map your events to the equivalent Google event, or leave the event as "custom".
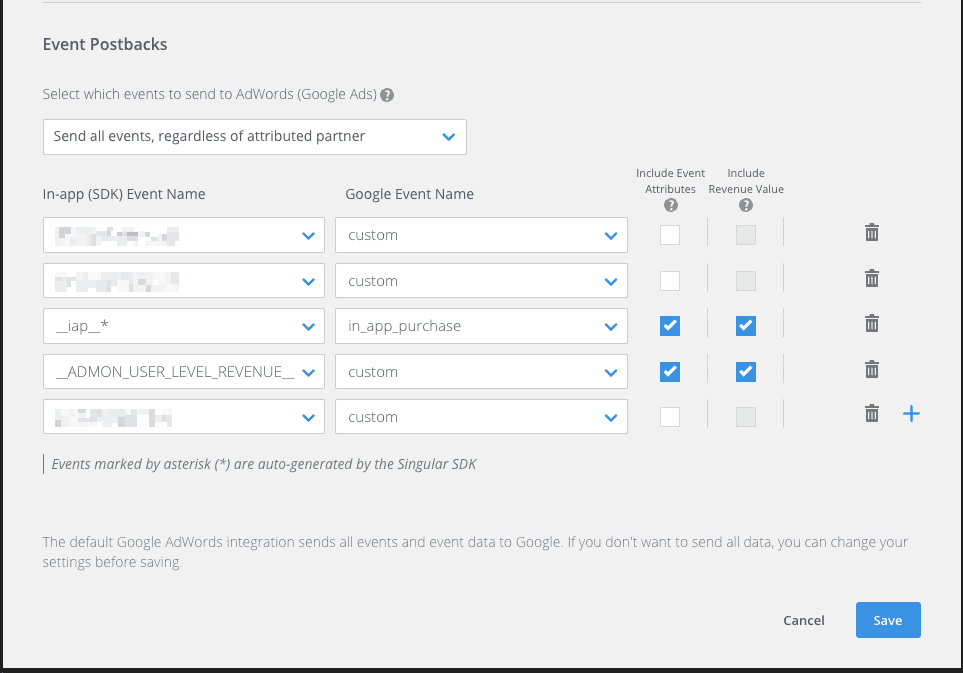
Pro Tip: If you want to import these events on Google Ads (Step 9), set the following dropdown to “Send All Events”. This will make sure that all required events flow to Google Ads and can be imported. You can switch it back to “Send only events attributed to Adwords” after they are imported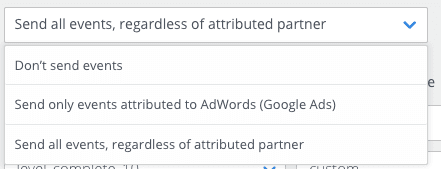
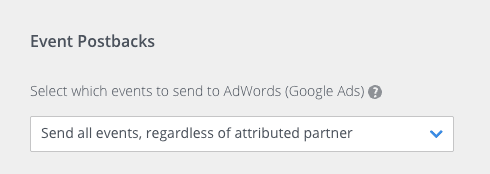
Click Save.
[Important] An important step in configuring your Google Ads integration involves setting up your conversion actions, also known as importing events. This enables Singular to start measuring your Google Ads campaigns.
In your Google Ads account, click on the Goals Icon.
Click the Conversions drop down in the section menu.
Click Summary.
Click +New conversion action.
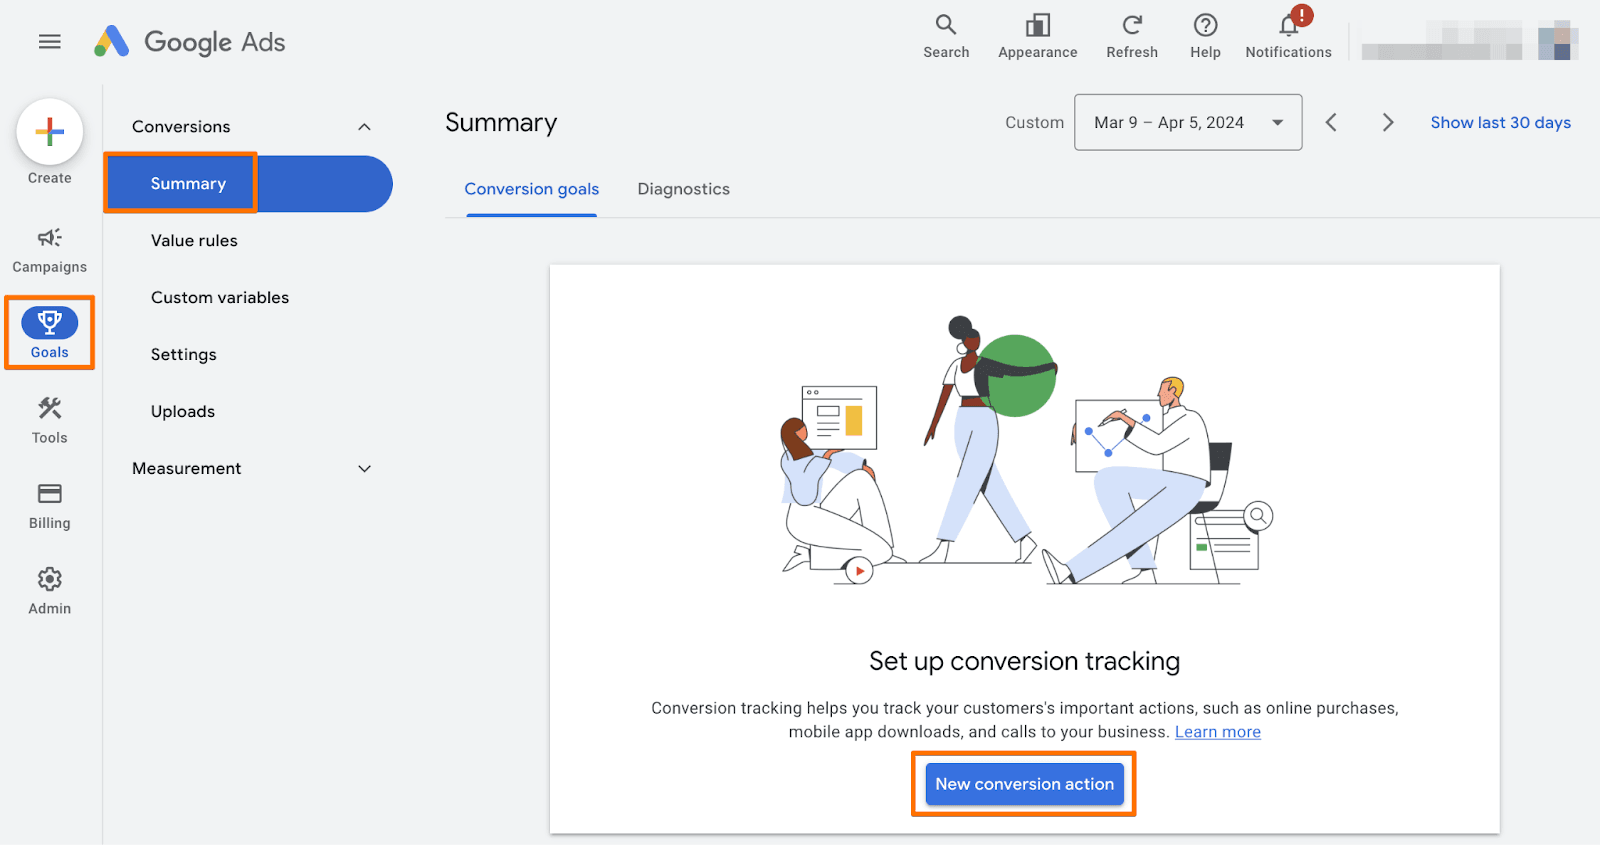
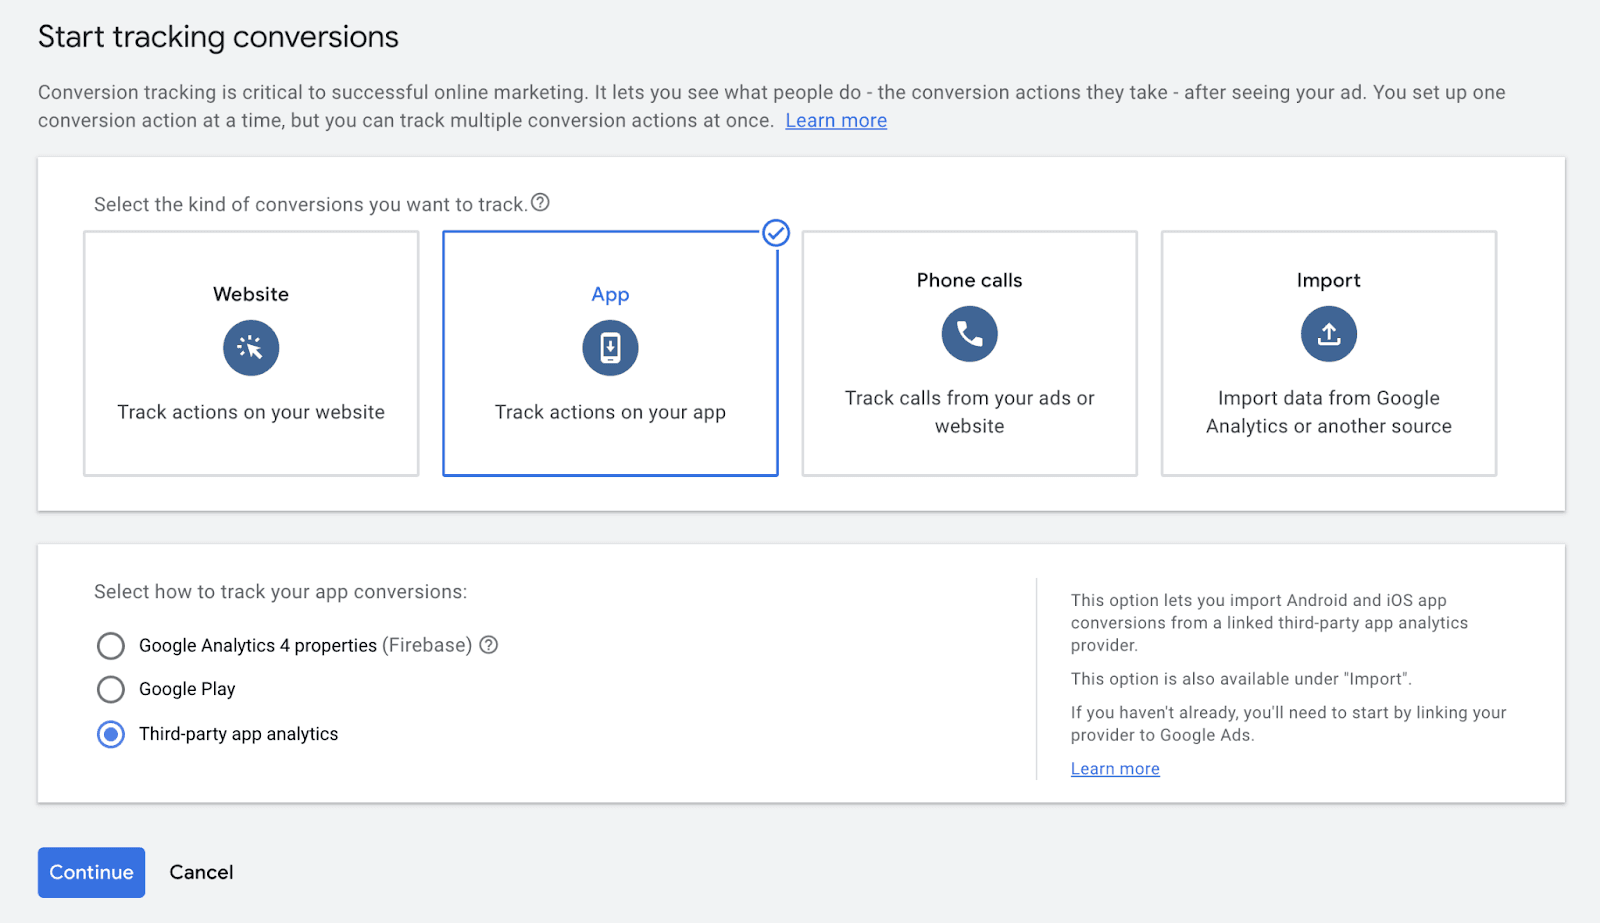
Select App from the list of conversion types.
Select Third-party app analytics, and click Continue.
Select events to import from your third-party app analytics providers
Check the box next to first_open for your app. This is necessary for tracking installs.
It is important to note that if you don’t import the “first_open” event, Singular will not be able to attribute installs to non-organic sources (campaigns, creatives, etc)
Note: You will not see Singular's events right away. The events show up in Google Ads only after at least one conversion event occurs since setting up the configuration in Singular.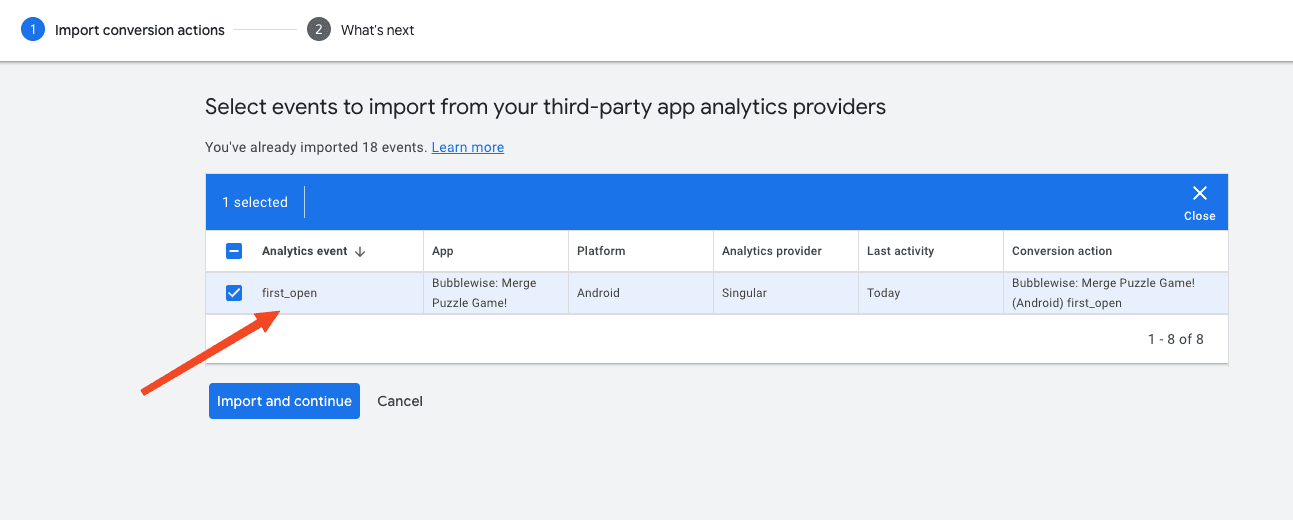
Check the box next to other events if you would like to import them. For re-engagement campaigns, make sure that you import the session_start event.
- Click Import and Continue, and then Click Done.
Step 2. Connect to Attribution Partners to pull data (cost, campaigns, etc)
This step is needed so that Singular can pull cost and other campaign data from your networks.
Set up a data connector for each of your network partners:
On the Singular dashboard, go to Settings > Data Connectors.
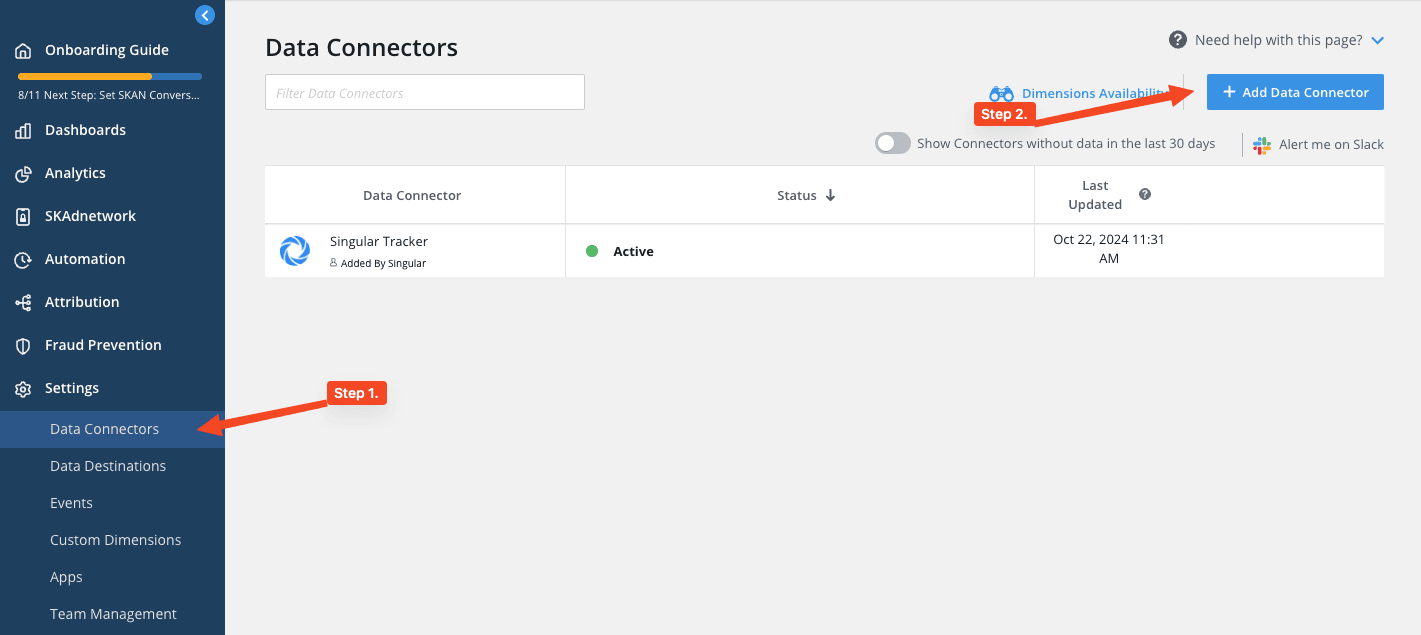
Click New Data Connector, and in the search box that appears, find your network partner.
In the partner configuration panel that pops up, provide the details required. For Facebook and Google Adwords, you will need to log in using a Facebook / Google account with relevant access. Otherwise it is usually an API key and a username. The panel will guide you on where to find the relevant details in your partner dashboard.
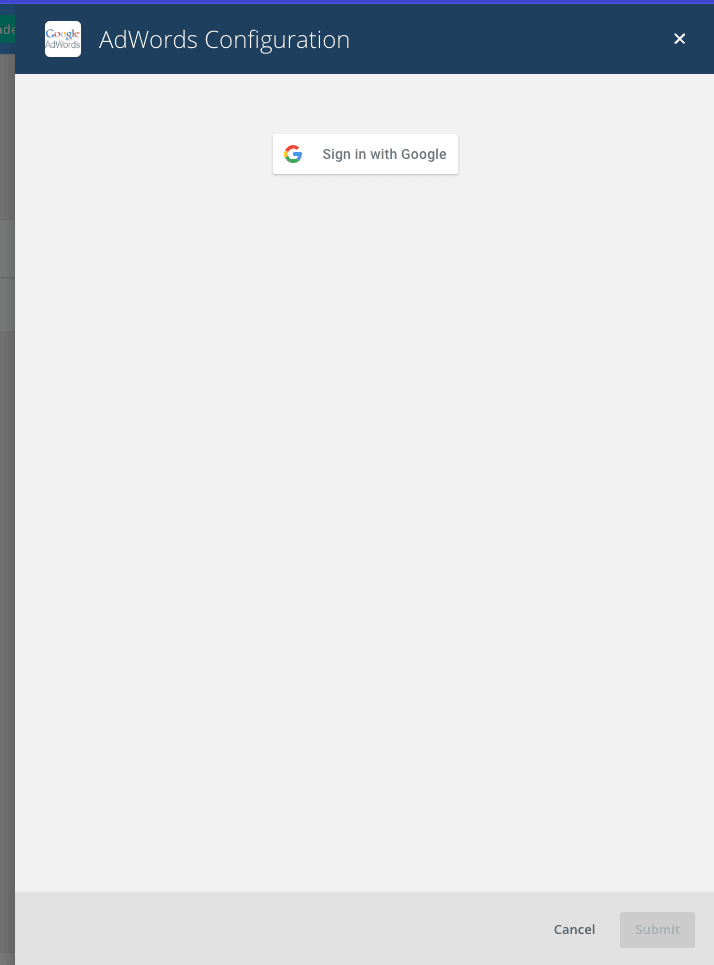
Setting Up Ad Revenue Attribution (Admob)
This section again is specifically tailored for engineers!. If you're not versed in technical details, consider passing this information to your engineering team for seamless integration.
Ad revenue attribution, also known as user-level ad revenue, ties ad revenue (usually on the user level or impression level) to the ad campaign through which the user was converted.
Ad revenue attribution reveals your complete advertising ROI - with the campaign cost, in-app revenue, and ad revenue all in one row.
Singular is integrated with mediation platforms such as Unity LevelPlay, AppLovin, and AdMob for ad revenue attribution. Singular also supports other mediation platforms through their generic ad revenue SDK integration.
You can get ad revenue attribution data from your mediation platform by adding a code snippet to your Singular SDK integration. This also allows you to get ad revenue data for SKAdNetwork campaigns.
Getting user-level ad revenue from your mediation platform enables Singular to send attributed ad revenue back to media sources that can accept this data to run AdROAS campaigns.
Admob
- Turn on the setting for impression-level ad revenue in your AdMob account:
- Sign in to your AdMob account at https://apps.admob.com.
- Click Settings in the sidebar.
- Click the Account tab.
- In the Account controls section, click the Impression-level ad revenue toggle to turn on this setting.
- Implement the paid event handler in your app.
When you load an ad format (such as "App Open," "Banner," "Interstitial," "Native," or "Rewarded"), set up a paidEventHandler as a callback function that is triggered whenever an ad generates revenue. The Google Mobile Ads SDK tracks impression events and calls this handler with the Ad generated revenue.
To do this, modify the "load" function of the ad format to include the paidEventHandler. Inside this callback, you manage the ad revenue data, validate it, and send it to Singular using the Singular.adRevenue function.
using Singular;

private void RegisterEventHandlers(RewardedAd ad)
{
    // Raised when the ad is estimated to have earned money.
    ad.OnAdPaid += (AdValue adValue) =>
    {
        // Validate and ensure revenue data is within an expected range
        float revenue = adValue.Value / 1_000_000f; // Convert micros to dollars
        string currency = adValue.CurrencyCode;

        // Check if revenue is positive and currency is valid
        if (revenue > 0 && !string.IsNullOrEmpty(currency))
        {
            // Construct and send the Singular AdMon Event
            SingularAdData data = new SingularAdData(
                "Admob",
                currency,
                revenue
            );
            SingularSDK.AdRevenue(data);

            // Log the revenue data for debugging purposes
            Debug.Log($"Ad Revenue reported to Singular: {data}");
        }
        else
        {
            Debug.LogError($"Invalid ad revenue data: revenue = {revenue}, currency = {currency}");
        }
    };
}
Start Running Ad Revenue/ROAS Campaigns
If you are tracking ad revenue attribution (user-level ad revenue) with Singular, you can run ad revenue ROAS-based campaigns with Singular's partners who accept ad revenue postbacks, including Google Ads
To run ROAS Campaigns, you will need to provide Google Ads with either one or both:
- Ad Revenue Event
- IAP Event
These events have revenue value attached to them, which Google Ads can use to evaluate the ROAS on your campaigns.
You can add these events in Attribution > Partner Configuration, under Event Postbacks
- Make sure the IAP revenue event is mapped to the proper event on the partner's end.
- map the Singular event named __ADMON_ USER_LEVEL_REVENUE__ to the appropriate ad revenue event on the partner's end.

Conclusion
Congratulations! If you've made it this far, you've most likely succeeded in integrating the Singular SDK into your Unity app for Android, from adding your app to the Singular platform to implementing sophisticated ad revenue attribution mechanisms. If not, at the least, this guide has equipped you with the simplest way to integrate Singular to meticulously track your app’s performance and marketing ROI.
Whether you're a developer fine-tuning the mechanics behind the scenes, a marketer analyzing campaign effectiveness, or a team leader overseeing project integration, this guide has set you up to fully leverage Singular's capabilities. You’ve learned how to send and analyze custom user IDs, track in-app events, manage in-app purchases (IAPs), and even run ROAS campaigns using ad revenue data from Google AdMob.
Important Notes:
This guide contains Unity-specific code examples tailored for Android applications.
If your app targets children or needs to handle deep links, additional steps are required to ensure compliance and functionality.
Utilize Google Ads to acquire new users and Google AdMob to optimize in-app ad revenue.
Keep experimenting with different integrations and settings to discover what works best for your app’s unique needs. For any challenges or further customization needs, utilize Singular’s support and the extensive community of developers using the SDK. Here’s to making your app not only functional but phenomenally successful through informed data-driven decisions!

Comments
Your comment has been submitted